UWIN Camera Survey Training Guide for Volunteer Community Scientists

![]()
![]()
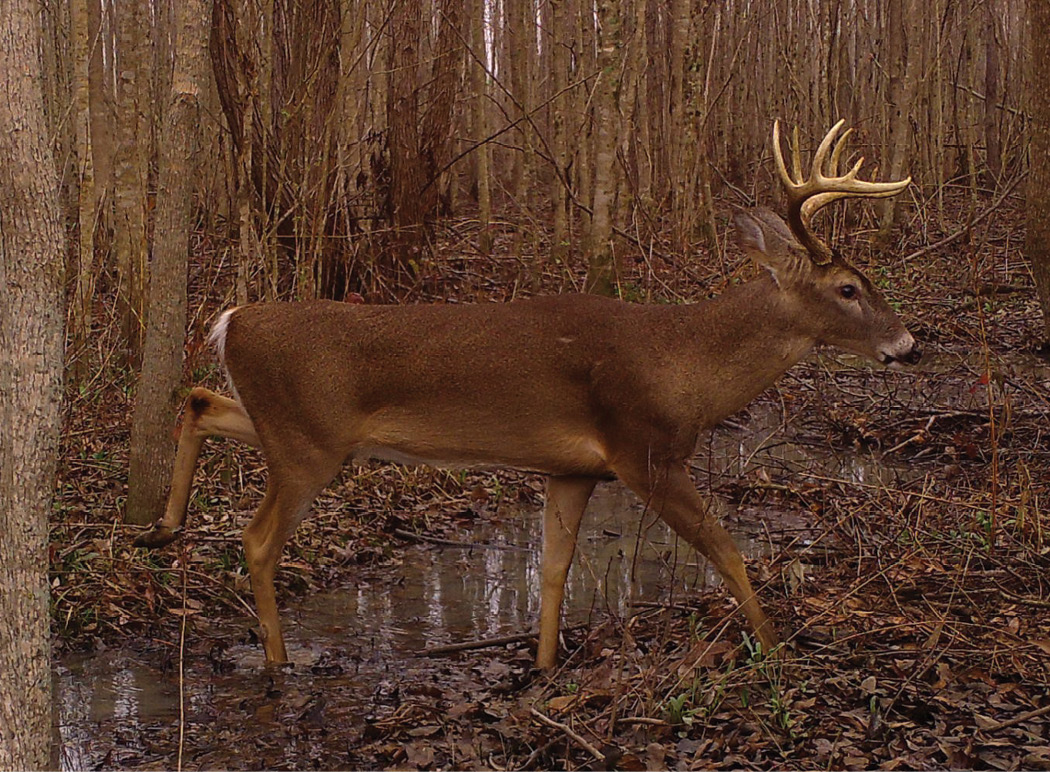
Table of Contents
Jackson Metro Urban Wildlife Project Overview
More Tips for Correctly Tagging Images
UWIN Volunteer Introduction
Since 2010, the Urban Wildlife Information Network (UWIN), a partnership of wildlife researchers across the United States, has been studying the importance of greenspaces for wildlife in urban areas. In 2019, the urban wildlife research program offered through the Mississippi State University (MSU) Extension Service joined the partnership as a representative of Jackson, MS. This partnership has positioned Jackson as one of the first cities in the Midsouth to join, helping to expand UWIN’s efforts and providing the opportunity to study urban wildlife ecology in a mid-size city with a unique cultural background.
UWIN has since grown to include nearly 50 partners located within the continental U.S., as well as in North, Central, and South America, Europe, and Africa. Through this collaborative network, we’ve gained the ability to better understand wildlife ecology and behavior within and across our cities. Furthermore, the information we collect can be critical to developing more wildlife-friendly communities and reducing human-wildlife conflict in the future.
This project provides multiple opportunities for people of all ages to learn about the wildlife in their communities. Our volunteers serve as community scientists who help our team deploy cameras and process imagery, allowing them to both learn and contribute to our growing body of knowledge. Similarly, teachers and students can engage in this project through our publicly accessible data and learn about the wildlife in their own backyards.
This training guide was created to assist project volunteers on how to properly and efficiently deploy cameras and process imagery for analysis. While some information is tailored to the needs of our Jackson-based project, we believe the following information and guidelines can apply to a wide variety of wildlife projects. Volunteers can refer to this publication to address any issues or questions that may arise during fieldwork or data processing. If you have any questions that are not covered in this guide, be sure to contact your local project coordinator.
As a volunteer with UWIN and your local partner, you have an extraordinary opportunity to do meaningful work, both in the field and from your computer. Your contribution has the potential to better inform the process of creating more wildlife-friendly cities in your own community and well beyond.
Thank you for assisting with this effort!
Jackson Metro Urban Wildlife Project Overview
Community scientists are part of a growing number of researchers and nature enthusiasts driven to understand and conserve the wildlife of their cities. Their efforts are being used to promote biodiversity and reduce human-wildlife conflict through informed management practices and wildlife-friendly design and development.
In 2019, MSU Extension staff and the Department of Wildlife, Fisheries, and Aquaculture faculty joined UWIN to contribute to a continent-wide effort to better understand how wildlife live and behave in our cities and towns. UWIN, started by the Urban Wildlife Institute at the Lincoln Park Zoo in Chicago, has grown into a partnership of researchers, biologists, and educators from nearly 50 cities across North America and beyond. Partner cities range from large metropolitan areas like Chicago, Toronto, and Atlanta, to medium- and small-size cities such as Little Rock, Iowa City, and Jackson.
UWIN’s wildlife monitoring program is carried out via motion-triggered cameras (i.e., trail cameras) placed in different greenspaces along predetermined routes in each city. Each partner city uses the same protocol to monitor wildlife populations and behavior patterns across geographic regions to better understand the urban wildlife ecology processes. Partners actively monitor their determined greenspaces for 1 month per season, for a total of 4 months every year, to capture seasonal differences in wildlife activity. At the end of each season, the images captured by the cameras are uploaded to an online database where trained biologists, students, and volunteers identify the species and tally the number of individuals in each image.
This data can be used for a broad array of scientific, educational, and managerial purposes. For example, data from several UWIN partners, including Jackson, were used in a study examining how gray and green infrastructure differences between larger cities and mid-size cities in the southern U.S. can influence wildlife communities. The scope of data collected can also extend to disciplines beyond ecology; one study examined how wildlife responds to the impacts of sociocultural trends like gentrification of communities across UWIN partner cities. These examples are just the tip of the iceberg of what this effort will provide over time.
In the Jackson Metro, more than 40 cameras are located in various greenspaces throughout our study area, including public parks, school campuses, golf courses, cemeteries, and other natural areas. To learn more about the project, the data, and what it is being used for, please visit the Jackson Metro Urban Wildlife Project StoryMap.
Before Entering the Field
Fieldwork is one of the most exciting parts of being a wildlife biologist. But most people don’t realize just how much thought, planning, logistics, and work are required to get ready for a single day in the field. It is not uncommon for wildlife biologists to spend months (and in some cases, years) preparing for a particular project that may only involve several days to a couple weeks in the field. Thankfully, the UWIN partner network developed a uniform protocol for the partnership, greatly reducing this preparation time.
There are still a couple of tasks volunteers must complete before entering the field. The first task is a review of the volunteer operating instructions and safety guidelines.
Volunteer Instructions
- Field Schedule
- Each season (four seasons) will have a minimum of three different field days (one for setting cameras, one for checking cameras, and one for pulling cameras).
- A schedule will be sent out to all trained volunteers at the beginning of each year to indicate the anticipated field dates for the upcoming year.
- Teams of two volunteers will be assigned a section of camera sites to maintain per season. Once the schedule is confirmed, only the assigned volunteers are to perform the specific activities with the cameras.
- Camera Kit Pick-up and Drop-off
- The location for picking up and dropping off kits will be determined by each partner before the season begins. Follow your local UWIN partner’s directions for acquiring the field kit and equipment for your city.
- Representation and Conduct
- As a volunteer in this project, you are representing your local organization, be it a university, zoo, or other agency. This means you are not to interject your personal opinions into your interactions with the public, media, or others.
- Dress
- When volunteering in general, and especially for the field portion of this project, you are required to wear your local project attire. This can be shirts, hats, vests, or attire with identifiable markers approved by your local partner. Usually, the landowners and managers of properties where the camera stations are located have been notified you will be wearing this attire for identification purposes. Please understand, many months of work went into identifying and requesting access to these sites—honoring this requirement is crucial to honoring these relationships.
- In addition to your project attire, be prepared to dress for the field with long pants, sturdy shoes or light boots, and rain gear when needed. Other field gear like insect repellent and flashlights is provided. See Kit Inventory Checklist on page 20.
- Transportation
- All volunteers are responsible for their own transportation for the field portion of the project. This does not apply to imagery reviewers, who are not required to travel.
- Electronic Equipment
- Imagery review requires a personal laptop, desktop, or tablet with a reliable internet connection.
- Reviewers must successfully complete the appropriate volunteer training and have an active Google account. If you do not currently have a Google account, please follow the steps listed on the Google Support webpage.
- A Gmail account is not required to have a Google account. Simply use your preferred email during the setup process.
- Imagery Processing (Tagging)
- All volunteers who successfully complete the volunteer training will be given an account on the UWIN Database. Then, the project coordinator will assign groups of images for each volunteer to classify.
- Protecting Imagery/Data
- Note: Under no circumstance will volunteers copy, save, screenshot, or distribute (e.g., social media, text, or email) imagery from memory cards or the online database due to copyright and privacy issues. Violators will be removed from the program.
Volunteer Safety Guidelines
The project will require fieldwork in urban, suburban, and rural areas. Each of these areas presents its own safety challenges.
- Awareness
- Volunteers need to remain aware of their surroundings for their own safety regardless of what setting they are in.
- More specifically, it is recommended that camera site visits be conducted during daylight hours (8 a.m.–3 p.m. ideally) to avoid lowlight situations during the fall and winter.
- Volunteers should not under any circumstances conduct site visits past sunset or before sunrise. Not only is this unsafe, but it also falls outside of typical operating hours for most of our sites. Our granted permission to conduct fieldwork does not extend to entering sites outside of standard hours without prior notice and approval.
- If any volunteer does not feel comfortable with a particular site, they should contact their local project coordinator immediately so that alternate arrangements can be made.
- Volunteers need to remain aware of their surroundings for their own safety regardless of what setting they are in.
- Buddy System
- The protocol explicitly states that at least two individuals check each camera for logistical and safety reasons. If a team member drops out, the remaining member should contact their project coordinator immediately for a replacement. Under no circumstances should fieldwork be conducted alone.
- Cell Phone
- It is strongly suggested that all volunteers carry a personal smartphone so they can communicate with the project coordinator if issues arise in the field.
- Additionally, having access to Google Maps, or a similar maps application, is useful in locating camera sites through project maps.
- Driving and Parking
- Volunteers must follow all state and local driving and parking regulations.
- Volunteers assume all legal responsibility driving to and from the camera sites.
- Each camera station overview form includes suggested parking at each site.
- Lastly, any required permits or written permissions will be included in each camera kit.
- Health and Medical Needs
- Volunteers are responsible for evaluating their own health and physical ability to complete fieldwork throughout the calendar year.
- Most sites are easily accessible by short walks (less than ¼ mile). Some sites will require volunteers to walk into and out of vegetation that could include biting and stinging insects, venomous reptiles, and poisonous plants. Appropriate field clothing and insect repellent (provided in field kits) should always be used. Review and follow CDC tick bite prevention guidelines.
Setting Camera Traps
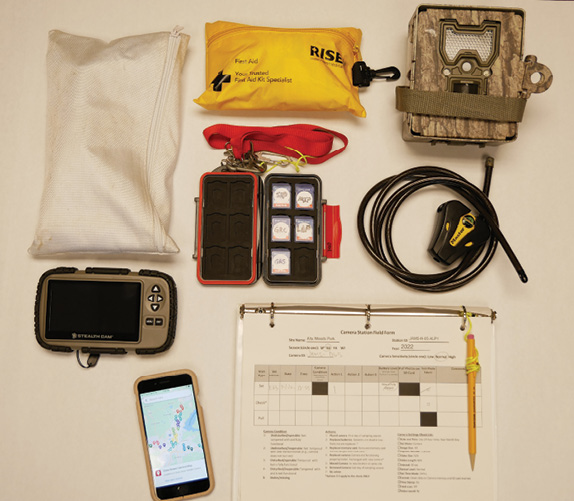
- Please review the included kit inventory, located in the binder, to ensure it includes all the required items before departing. See Kit Inventory Checklist on page 20.
- At the site location, bring the following items in the provided field bag:
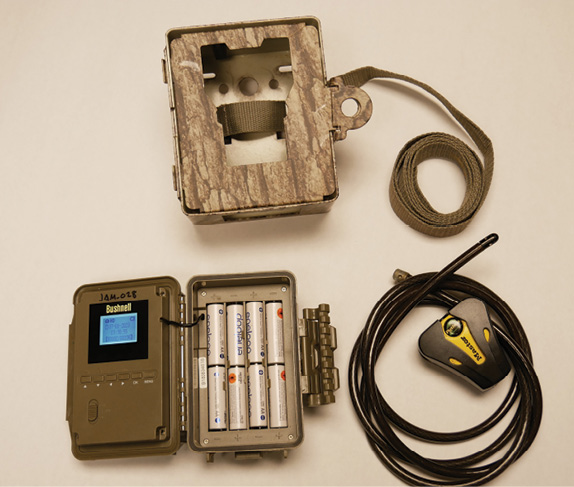
- Camera trap (i.e., camera encased in a metal security box; if the mounting position is far, we recommend bringing a backup.)
- Cable lock
- Binder with field forms
- SD card case with two cards labeled for each site (e.g., “SHP” for Smith Park; one each for deployment and check) on a lanyard with cable lock keys, and a multi-tool. The three-letter code for each site will be listed on the corresponding field form.
- SD card reader
- Smartphone with site map
- Field tool bag that includes hand shears, WD-40, extra batteries, etc.
- First aid kit
- Use the map on your smartphone or other directions provided by the project coordinator to find the predetermined mounting location for the camera trap. Please note that the point on the map may not be the exact location due to limited precision. Consult the site overview form in your binder for a description of the mounting location and look for an identifying marker. This may be an orange or red “X,” blue flagging at head height, or any other marker determined by your local partner.
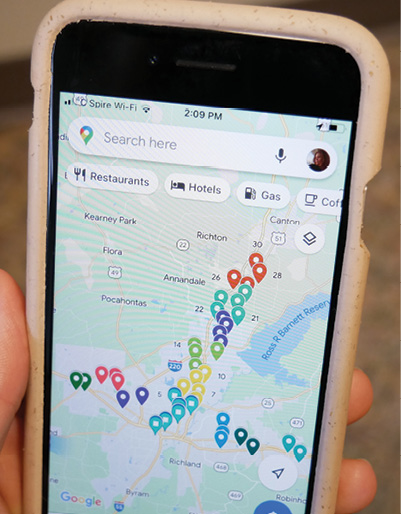
Figure 1. A Google map with camera site locations provided by the project coordinator. (Photo by Eden Blackwell/University of Alabama) - Complete the overview and set sections of the Camera Station Field form (Figure 2) for the site, located inside the field binder. Some elements like the site name and ID are already provided and should be used to locate the correct sheet for each site.
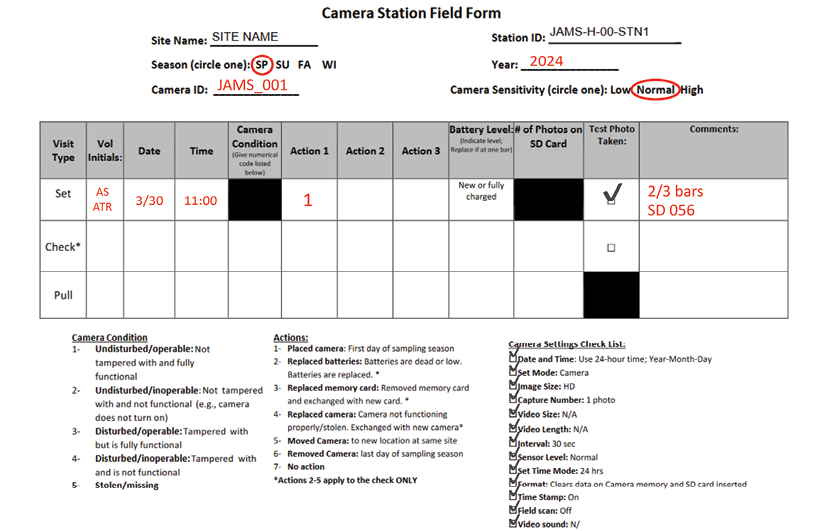
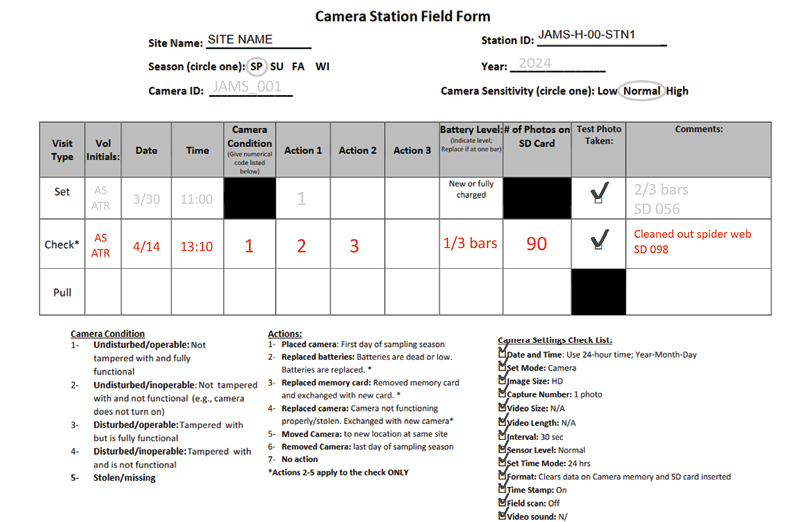
Figure 2. Example of what the field form will look like during a set visit. - Record the season and year, in addition to the camera ID and sensitivity level. Each camera ID can be found written in permanent ink on top of the camera and above the internal screen.
- Season and year should indicate when the camera is active (SP = spring, SU = summer, FA = fall, and WI = winter). For the winter season, label the year as it would be during the main observation month (i.e., if the camera is being set at the end of December 2023, the year should be 2024).
- Record the initials of the members of your team, the date and time, as well as any actions performed (e.g., write “1” under action 1 to indicate the camera has been set). Note any pertinent information about the site in the comments section, such as recent flooding or landscape changes.
- Record the season and year, in addition to the camera ID and sensitivity level. Each camera ID can be found written in permanent ink on top of the camera and above the internal screen.
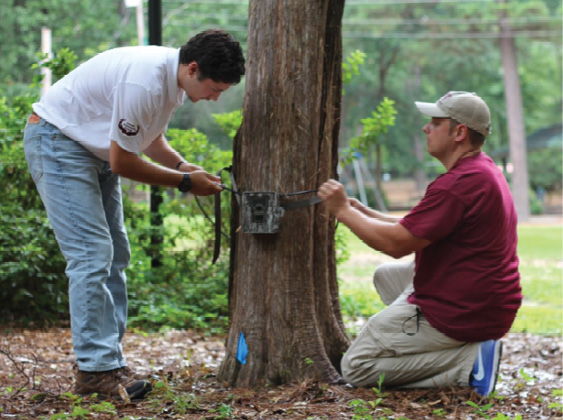
- Strap the camera box to the marked tree or pole, paying attention to the designated height and cardinal direction indicated by the mark.
- All cameras should be placed roughly 3 feet up the tree trunk.
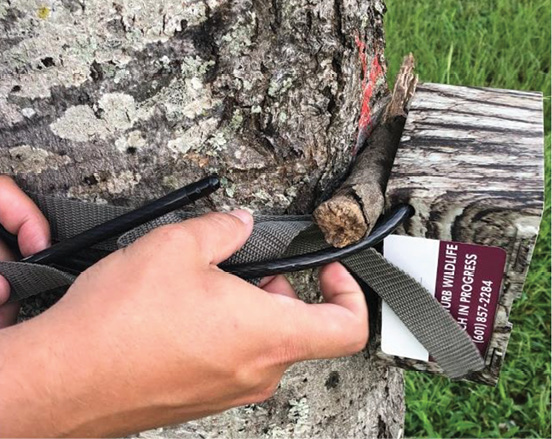
- Care was taken when establishing mounting positions to avoid capturing human activity. This was done by placing or facing cameras away from high-traffic areas (e.g., playgrounds, walking tracks, parking lots, sitting areas, etc.). To further reduce image captures of human activity, especially human faces, a small stick (or doorstop, provided in the field kit) can be wedged in between the tree and camera to angle the camera slightly downward.
![A hand holds an affixed camouflage camera while the other hand marks a red X with a lumber crayon on a tree trunk.]](/sites/default/files/publication-images/P4010/Fig3.jpg)
Figure 3. A marked “X” indicating the cardinal direction and height the camera needs to be placed. Please note not all sites will have a marking due to site owner restrictions. (Photo by Matthew Oswald/South Carolina Department of Environmental Services) - Insert an SD card, labeled with the corresponding site code, into the camera and turn the camera to setup mode to view the camera settings. While all cameras are preset by project staff members before deployment, please review the following checklist to ensure the cameras are properly set. This list can be found on the Camera Station Field form (Figure 2):
- Date and time: set correctly; date format depends on camera model
- Set mode: camera
- Image size: HD or 3M, depending on camera model
- Capture number: 1 photo
- Interval: 30 seconds
- Camera sensitivity: normal (unless instructed otherwise on datasheet)
- Time stamp: on
- Field scan: off
Note: All video settings can be disregarded, but make sure the mode is set to camera!
Tip: To keep the camera box strap from pinching in the steel box before affixing it to the tree, fully pull the strap through the openings on the back of the box so that the black buckle rests snug against it. Then, cinch the camera strap tightly to the tree.
- After positioning the camera box and confirming the camera is set properly, turn the camera on and place it in the box. Look for the blinking red light that indicates the camera is taking a photo. To test your positioning, move in front of the camera for about 1–2 minutes. (Remember: the camera trigger is set to a 30-second delay, so walk slowly and stop occasionally to capture multiple pictures at different distances.)
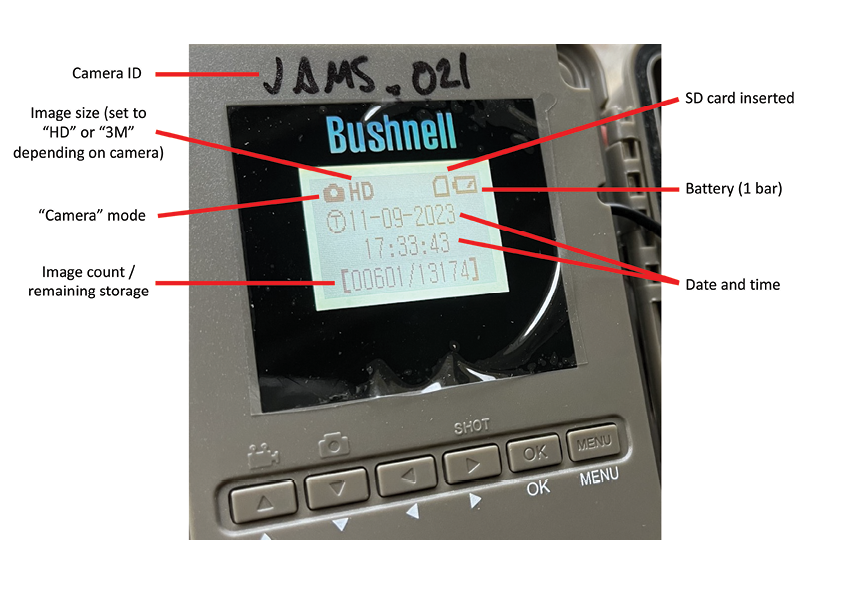
Figure 4. Display of date, time, and setting for Bushnell E3 trail camera. (Photo by Ann Smithson/Mississippi State University) 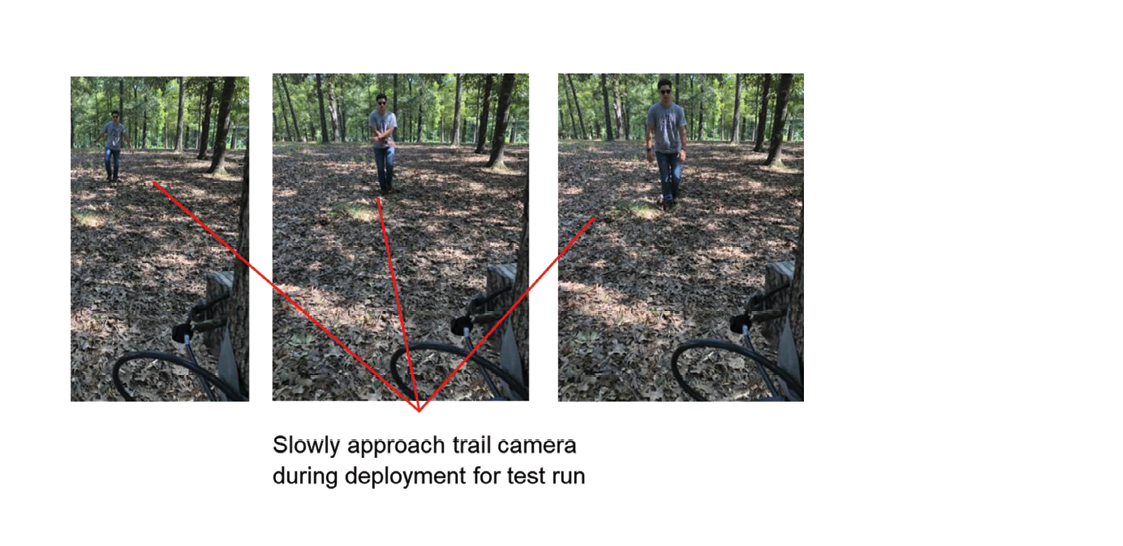
Figure 5. Deployment test run. (Photo by Adam Rohnke/Mississippi State University) - Turn the camera off. Remove the SD card from the camera and insert it into the SD card reader. From the home screen, select the option to review the test images (an icon of two rectangles) to check the angle and view of the camera.
Make sure the camera:
- has a clear line of sight out about 25 feet with no obstructing vegetation (e.g., branches, vines, tall grass, or other debris) that can move in the wind. If problematic vegetation is present, trim or remove it using the tools provided.
- is properly angled to avoid human activity. This includes making sure cameras are not directly angled toward a road, as passing vehicles can trigger the camera.

Figure 6. Insert SD cards into the SD reader with the back of the card facing up. (Photo by Ann Smithson/Mississippi State University)
- Once the review is complete, delete the test images from the SD card. You can delete images with the SD card reader, or by inserting it back into the camera and using the format function in setup mode. Once the card has been cleared and has been inserted again, make sure to turn the camera on.
- Return the camera to the security box. Reattach the front door and close. Follow the steps below to properly secure the camera trap to the tree before leaving the site. Securely tucking the straps and cables reduces false triggers (e.g., wind blowing strap tail in front of camera, raccoons playing and chewing on cables).
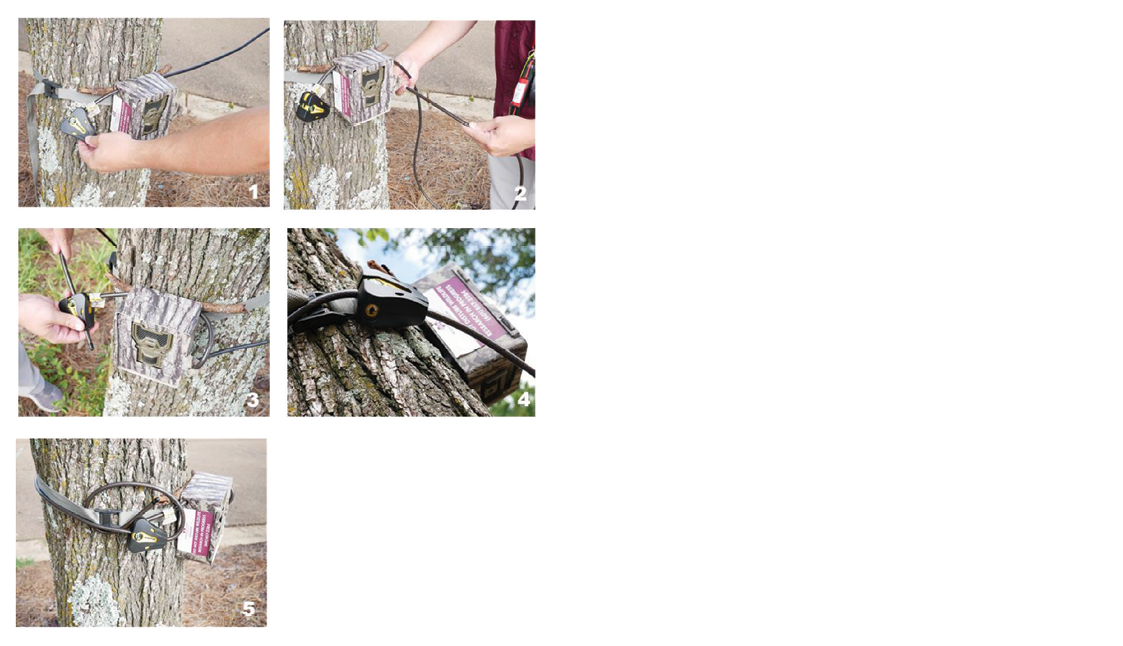
- Begin at the hinge side of the security box and feed the cable through the holes on the sides of the box. The lock should rest against the box.
- Feed the cable through the holes on the door from the front and wrap the length of the cable around the tree.
- Insert the end of the cable into the lock as indicated by a yellow arrow on the lock itself.
- Face the lock downward to avoid exposure to rain.
- Secure the loose cable and strap ends so that they do not trigger the camera.
Checking Camera Traps
- Review the included kit inventory located in the binder to ensure it is complete before departing.
- Once you arrive at the site, the six main pieces of equipment you will need in your field bag are:
- SD cards in the card case
- Cable lock keys (attached to the SD card case lanyard)
- Binder with field forms
- Smartphone with site map
- Field tool bag with supplies (e.g., shears, etc.)
- First aid kit
- Use the site map (if needed) to find the camera trap. Make sure to approach the camera from the front holding the binder sign that says “Project Staff” to trigger the camera, as this photo is used as a time reference point during image analysis. After approaching the camera, unlock the cable and remove the camera from the security box.
- Check for any damage to the box and camera. Open the camera and switch to setup mode. Check to make sure everything is functioning correctly. This includes:
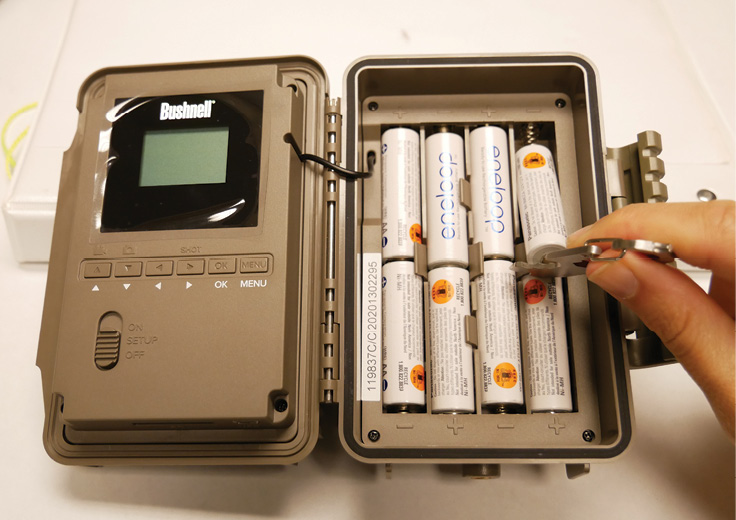
- The battery life is at two bars or greater. If they need to be replaced, batteries can be removed from the camera using the multi-tool provided in the kit. It is easiest to pry the batteries out starting with the column farthest from the screen.
- The date and time are correct. If the date and time have been reset, make note of it in the comments section and change it to the correct time. See step 6 in Setting Camera Traps. Images with date and time errors can be fixed retroactively by project staff.
- The number of pictures taken is not abnormally high (a normal amount is typically somewhere between 30–140 for a 2-week period). If the camera has taken 400-plus images, there may be something wrong with the camera, or the camera may be detecting a multitude of false triggers (e.g., blowing vegetation or shadows).
- You can check for false trigger photos by inserting the SD card into the SD card reader. If the camera is functioning as normal, but there are many empty photos, volunteers should set the sensitivity to low instead of normal and readjust the angle of the camera, while clearing any vegetation that may be in the way. If there appears to be a malfunction, please replace the camera.
- If the high number of images can be attributed to high animal activity, then leave the camera sensitivity at normal. Contact the project coordinator for direction, if needed.
- Fill out the check section of the field form. Indicate the camera condition and any actions you complete during the visit using the camera conditions and actions codes provided on the bottom of the form. Normally, you will only be replacing batteries (if below two bars) and SD cards during the check visit. Make note of relevant changes to the site (e.g., threats to the designated tree, changes to the landscape, etc.).
Note: If the camera is inoperable or stolen, take the SD card out (if the camera is there) and place it into the SD card case. Follow steps 5–10 in the Setting Camera Traps section to correctly replace the camera. Record the new camera ID underneath the initial ID.
- If everything is functioning properly, turn the camera off and remove the SD card, place the card in the SD card case, and insert the second SD card labeled for that site into the camera.
- Turn the camera to setup mode to confirm it turns on and is properly set. Then, be sure to turn the camera on and place it back into the security box. Lock the box, making sure to wrap and tuck the tail of the strap and cable out of the way.
Pulling Camera Traps
- Review the included Kit Inventory Checklist located in the binder to ensure it is complete before departing. The main pieces of equipment you will need are:
- SD cards in the card case
- Cable lock keys (attached to the SD card case lanyard)
- Binder with field forms
- Smartphone with site map
- Field tool bag with supplies (e.g., shears, etc.)
- First aid kit
- Approach the camera from the front while holding the “Project Staff” side of the binder in front of you to trigger a photo.
- Unlock the camera box and open the camera to check if it is still operational and how many photos were taken. Fill out the pull section of the field sheet, as you did for the set and check visits. Be sure to make note of the time, the number of photos, battery level, and any other relevant information. Providing accurate data on your field sheets allows our data team to process imagery faster and acts as a physical reference in case there was a malfunction during the season.
- Normally, the only action for pulling the camera will be 6, which means “removed camera; last day of sampling season.”
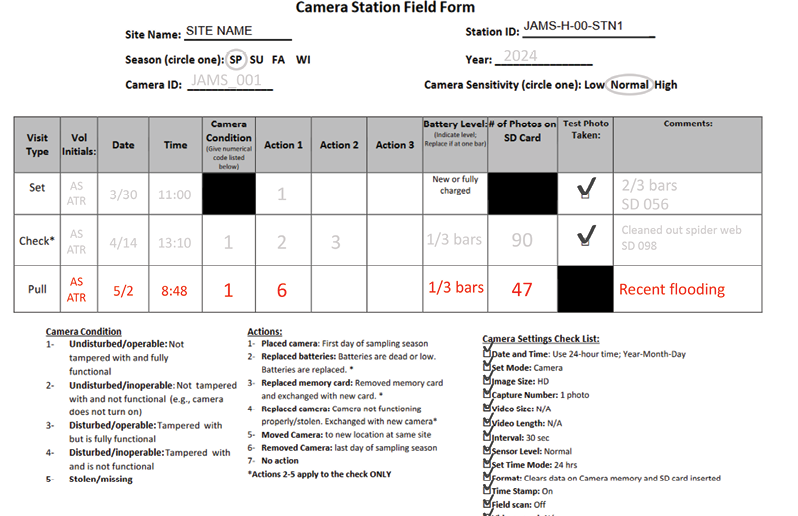
Figure 11. Example of what the field form will look like after the pull.
- Normally, the only action for pulling the camera will be 6, which means “removed camera; last day of sampling season.”
- Turn the camera off, take the SD card out of the camera, and place it into the SD card case.
- Check to see if the marked “X” is fading on the mounting point. If faded, re-mark using the lumber crayon.
- While some sites have trees available as mounting points, you may not be allowed to mark property such as fence posts or light poles. Determine the best way to identify your mounting point for a site, be it a photo reference in the field binder or a removable identifier.
- Make sure to place all camera equipment in the kit crate and check off each piece of equipment on the Kit Inventory Checklist. Please make sure to clean out any debris or other critters from the camera and security box before placing them back in the crate.
- To this point, we recommend you do not leave the kit in your vehicle or house as it may have little “friends” hiding in it. Leave the kit in a garage or covered space before returning it to the drop-off point.
Operating the UWIN Database
This section was adapted from UWIN’s 2019 Chicago guidelines and instructions.
- To begin tagging images for wildlife, a Google account is required to access the database.
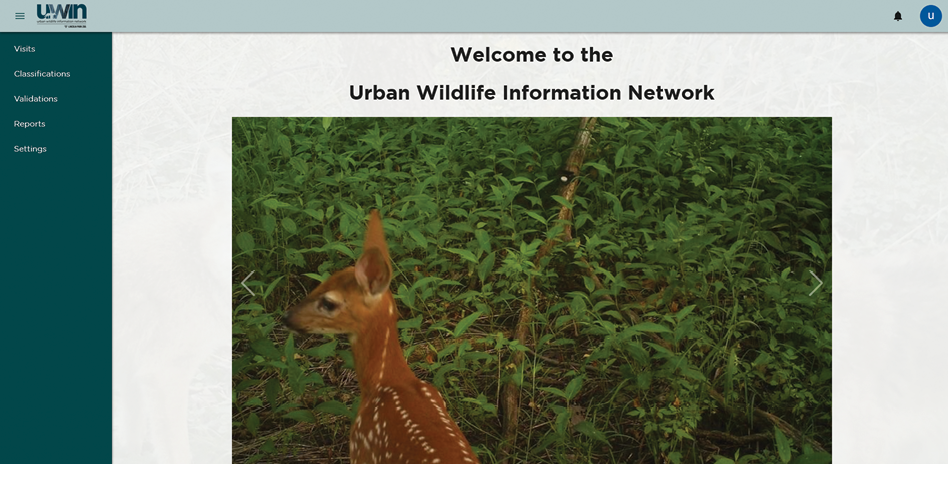
Figure 12. UWIN database homepage. The navigation tabs are in the left column.
Once signed in, click on the classifications tab in the upper left corner of the screen to view the photo groups that have been assigned to you.

- Click classify (indicated by the tag symbol under the actions column) on any photo group to begin tagging images. The tagging page will display the image and ask for species, number of individuals in the photo, and details about the species. Each data field provides a drop-down list of possibilities that are commonly used nationally.
- Please note not all the options available under the species and details tabs are used in our project. Please refer to your partner’s species tag list for a verified list.
- The max number of individuals per species in a detection used for analysis is 6 (e.g., if there are 10 white-tailed deer in the image, choose the “6+” option in the number of individuals tab).
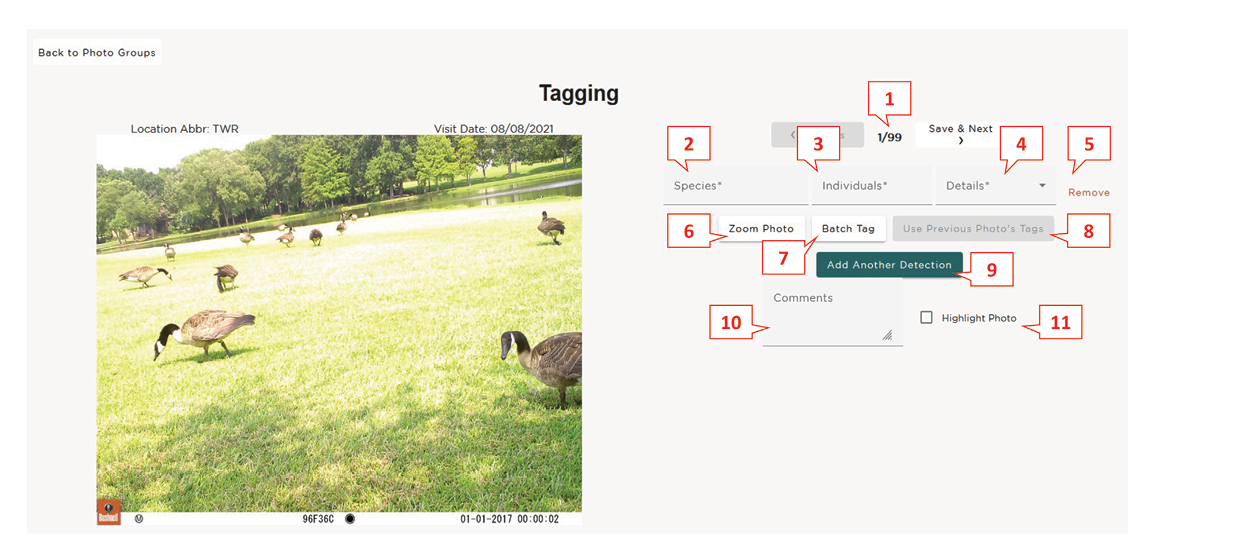
Figure 14. Example of a photo tagging page with numbered guide.
- Navigate between the different photos in a group. Your place will save automatically as soon as you move to the next photo.
- Choose a species from the drop-down list by clicking on the field.
- Choose the number of individuals of the chosen species in the image by clicking on the field.
- Add any details regarding the detection from a drop-down list by clicking on the field.
- For entries that are no longer needed (i.e., removing an incorrect additional species detection), you can use the remove feature. Please note that every photo requires at least one entry (you may use the tag “empty” for empty photos).
- The zoom photo button allows you to zoom in on the photo to help effectively tag images that may be difficult to classify due to an obscured, distant, or smaller detection. You can also navigate between different photos while the zoomed-in image is on the screen, but please be aware you cannot tag photos through this function.
- The batch tag function can be used to tag multiple photos at once, if they all contain the same species and number of species in the image. Clicking on the load more images tab will load three more photos to the batch. Notice that each photo must be selected (outlined in purple) to be added to the detection. Use caution when using batch tagging. Sometimes there can be a sneaky squirrel or bird that is hard to see in the smaller thumbnails!
- The use previous photo’s tags tab simply allows you to use the same detection for the current photo that was used for the previous photo. Again, as with batch tagging, make sure the image contains the same species and number of individuals as the previous image. Please note: If you decide to go back and change the detection of the previous photo, then the photos tagged using this function will also be changed.
- If multiple species are present in the photo, use the add another detection tab to add another species.
- The comment box is optional, but it can be used to add useful information for our data team when validating detections. For example, you may include information on where to locate a hard-to-see detection in a photo (e.g., “squirrel tail visible behind tombstone on the left” or “deer head peeking out of foliage, center right”).
- The highlight checkbox should be used to tag images with rare wildlife or interesting behavior. Highlighted photos will be used for reporting, social media, and other public relations products, so please use your best judgment when using the function (i.e., an image of an eastern gray squirrel exhibiting normal behavior would not be considered a highlight, but an eastern gray squirrel carrying a slice of pizza is!).
Tip: When using a laptop or tablet, double-check to ensure the image has been selected. When quickly clicking through the images, the program can sometimes freeze momentarily.
- Once all images have been classified, save & submit the photo group. You will be returned to the classifications page and can select the next photo group assigned to you.
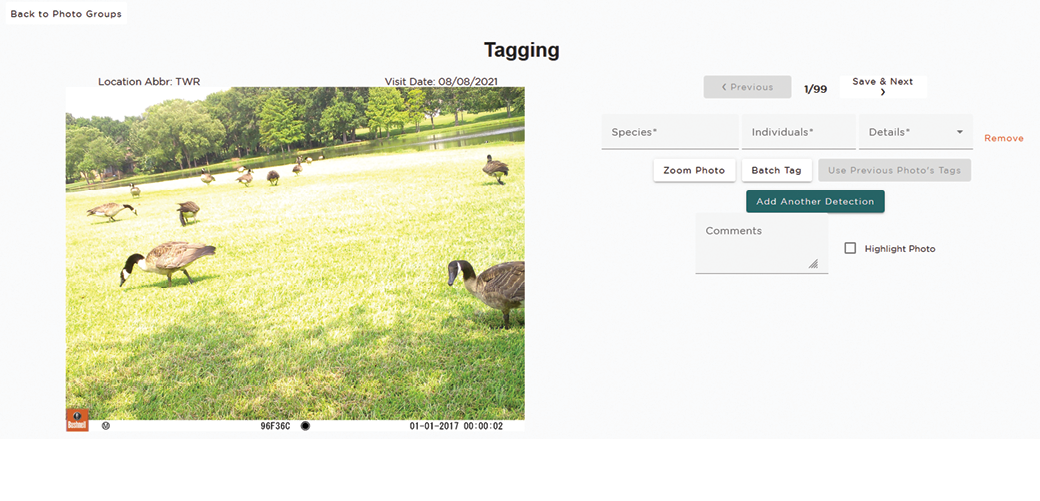
Figure 15. Example of a complete photo tagging page.
More Tips for Correctly Tagging Images
Below are some basic tips and advice for tagging imagery on the UWIN database, in addition to guidelines set by our own project. Please consult with your local partner for their study guidelines and parameters.
Basic Tips
- While tagging images, please turn off all distractions and fully focus on the detections (an individual animal in the image). Some images take longer to analyze and may contain only a portion of an animal, or the animal may be blurry or blend into the environment. It is essential that the wildlife is accurately identified to provide correct data for analysis.
- Tagging is most effective and efficient on a large desktop monitor along with a separate mouse.
- The observer’s eye is naturally drawn to the most obvious detection. To reduce missed detections, be sure to scan each image from left to right and top to bottom to ensure nothing is missed.
- Use discretion when tagging. Ask yourself if any detections in the background of an image (i.e., did not trigger the camera) truly impact the area of study. The general rule of thumb is any detections outside of the property line are not relevant. This includes sidewalks bordering parks, adjacent roads or houses, bike paths, and so on. Detections far off in the distance (even within property lines) do not need to be counted, such as distant golf carts on a separate part of the course.
- Use your best judgement to classify the wildlife in the images. If you can’t identify the specific species, use the general name for the animal.
- For example, if you can’t identify which squirrel species (fox or gray squirrel) is in the image, but you know it is a squirrel, submit the more general identification of “Tree squirrel – no ID.”
- Do not add any species to the list without consulting the project coordinator.
Using Details
The details section allows taggers to enter additional data and elaborate on the detections in each photo. Taggers are encouraged to be as specific as possible and use the details section whenever applicable. The details section is most commonly used for the following species: white-tailed deer, humans, and domestic dogs.
Humans
- A human on a riding lawn mower should be tagged as “human,” with “mower” selected in the details drop-down. Do not list the mower as a separate vehicle.
- Humans who are operating maintenance equipment but are not operating a riding lawn mower (e.g., using a weed trimmer or other piece of machinery) do not fall under this category.
- Humans who are operating a vehicle such as a golf cart or ATV should be tagged as “Human – on/with vehicle.”
- Volunteers and staff members should be tagged as “human, researcher,” but do not assume every human approaching or interacting with the camera is a member of our team. Project staff typically are only seen at the beginning and end of each photo set, usually wearing volunteer attire and holding the field binder sign that reads, “Project Staff.”
Deer
- If a white-tailed deer is observed with antlers (including “button bucks” that have visible pedicles), tag the image with “antlers” in the details drop-down menu. If there are multiple deer in an image, some with antlers and some without, you would still use this tag. You do not need to use the “antlerless” tag for deer without antlers.
- If the deer is blurry or the head is not visible in the photo, and there are no young present, simply leave the details field blank
- If juvenile deer are present, use the “young present” tag if adult deer are also in the photo, or “young only” if there are only juveniles.
- If antlered deer are in photos in addition to juvenile deer, the “young present” tag would take priority.
Dogs and Cats
- Domestic dogs should be marked as “off leash” when applicable. For dogs that are leashed, the details field can be left blank.
- No additional info is needed for domestic cat detections.
Common Tagging Mistakes
- Never assume that an animal in consecutive photos is the same animal. Only tag what you see in the current image that you’re reviewing.
- For example, if you see a white-tailed deer with antlers in one image and the next image has a white-tailed deer, but you cannot see its head, do not assume it’s the same deer. Tag it as a “white-tailed deer” with the details field left blank.
- Do not add a detection for an animal sign (e.g., chewing, holes, scrapes, rubs, scat, etc.). Only add a detection if you observe the animal creating the sign in the image.
- However, you may record any visible signs in the comments section.
- Tag avian species as “bird” (if you know the species, put it into the comments section). Do not use any of the bird identifications listed in the selection menu unless otherwise indicated by your local coordinator.
- The only exceptions to this are Canada geese and wild turkeys. For these species, please use “Canada Goose (CT)” and “Wild Turkey (CT),” respectively. Do not use the tags for these species that do not have (CT) at the end, as those are used by other UWIN partners studying digital audio instead of digital imagery.
- If human disturbance triggers the camera, such as a ball, tag the image as “empty” if no humans are present.
- This includes disturbances caused by project staff members, such as lock cables entering the frame when dismantling the camera trap.
- If you can’t tell what the animal is or if the image is blurry (but there is a visible detection, such as an animal with a movement blur), tag the image as “unknown.”
- If you can’t see anything in the image because there is glare, fog, shade, or the image is too dark, tag the image as “empty.”
Equipment
- The strap runs through the security box to fix it to the tree or other mounting location but does not need to be fed through the camera itself, as the cameras fit snugly into the security boxes.
- Some security boxes will have a small metal hasp that prevents the door from being pried open. This otherwise loose piece is attached to the security box by fishing line. Please make sure this hasp has been properly attached and locked while securing the camera trap.
- Your section kit will be stocked with several cameras at deployment, but you only need to carry two (one backup in case of a malfunction) from your vehicle to the designated tree at each camera station. A field bag is provided for carrying just what is needed at the tree site.
- The equipment bag contains miscellaneous items that may help with minor obstacles you encounter in the field, including shears to cut back vegetation, a flashlight, and topical ointment for poison ivy/oak.
- Use WD-40 on cable lock cylinders that become difficult to unlock.
- Wear the lanyard around your neck for ease of managing the keys and changing out camera batteries with the multi-tool. It’s also helpful for changing out SD cards and not leaving them behind! Be sure to press the cards into the case gently but firmly.
- One binder is included in each camera kit. Station forms are provided for each site location and are pre-populated with full site ID abbreviation (e.g., JAMS-S-01-SHP1). One blank sheet with no site data is included in each binder if a replacement is needed.
- Use the “Project Staff” side of the binder to signal your affiliation with the research site when approaching cameras for check and pull.
- Site overview forms can help you find the mounting location in case GPS and the red “X” are not helpful or have been removed. Contact information for landowners or park personnel is also provided, including tips on where to park safely and lawfully.
- Field forms are printed on water-resistant paper to preserve data in case you are caught in the rain. Use only a pencil or ballpoint pen on these forms! Markers and felt-tip pens will run if the paper gets wet.
Figure 19. Lanyard with SD card case, cable lock keys, and multi-tool. (Photo by Eden Blackwell/University of Alabama) 
Figure 20. Project Staff binder with forms for data collection and information useful at each site. (Photo by Eden Blackwell/University of Alabama)
Kit Inventory Checklist
|
Set |
Check |
Pull |
||
|---|---|---|---|---|
|
Cameras |
6 |
|||
|
8 batteries per camera |
40 total |
|||
|
Security boxes |
5 |
|||
|
Straps |
5 |
|||
|
Extra camera |
1 |
|||
|
Extra batteries |
8 |
|||
|
SD card lanyard |
1 |
|||
|
SD card case with cards |
10 cards |
|||
|
Keys |
2 |
|||
|
Multi-tool |
1 |
|||
|
Binder with field forms |
1 |
|||
|
Field forms |
5 |
|||
|
Site overview forms |
5 |
|||
|
Pencil |
1 |
|||
|
Cable locks |
1 |
|||
|
SD card reader |
2 |
|||
|
Head lamp |
8 |
|||
|
Batteries |
8 |
|||
|
WD-40 |
1 |
|||
|
Technu |
1 |
|||
|
Insect spray |
2 |
|||
|
First aid kit |
1 |
|||
|
Shears |
1 |
|||
|
Lumber crayon or paint |
1 |
This work is supported by the Research and Extension Experiences for Undergraduates (REEU) fellowship program [grant no. 2017-67033-26015] from the USDA National Institute of Food and Agriculture. Any opinions, findings, conclusions, or recommendations expressed in this publication are those of the author(s) and do not necessarily reflect the view of the U.S. Department of Agriculture.
The information given here is for educational purposes only. References to commercial products, trade names, or suppliers are made with the understanding that no endorsement is implied and that no discrimination against other products or suppliers is intended.
Publication 4010 (POD-08-24)
By K. Ann Smithson, Extension Associate I, Central Mississippi Research and Extension Center; Adam T. Rohnke, PhD, Assistant Extension Professor, Central Mississippi Research and Extension Center; Eden Blackwell, PhD Candidate, Anthropology, University of Alabama; Matthew Oswald, Beachfront Project Manager, South Carolina Department of Environmental Services; and Kimberly Rivera, Urban Wildlife Information Network Coordinator, Elizabeth W. Lehrer, Assistant Director, and Seth B. Magle, Director, Urban Wildlife Institute at Lincoln Park Zoo in Chicago.

The Mississippi State University Extension Service is working to ensure all web content is accessible to all users. If you need assistance accessing any of our content, please email the webteam or call 662-325-2262.
Select Your County Office
Authors